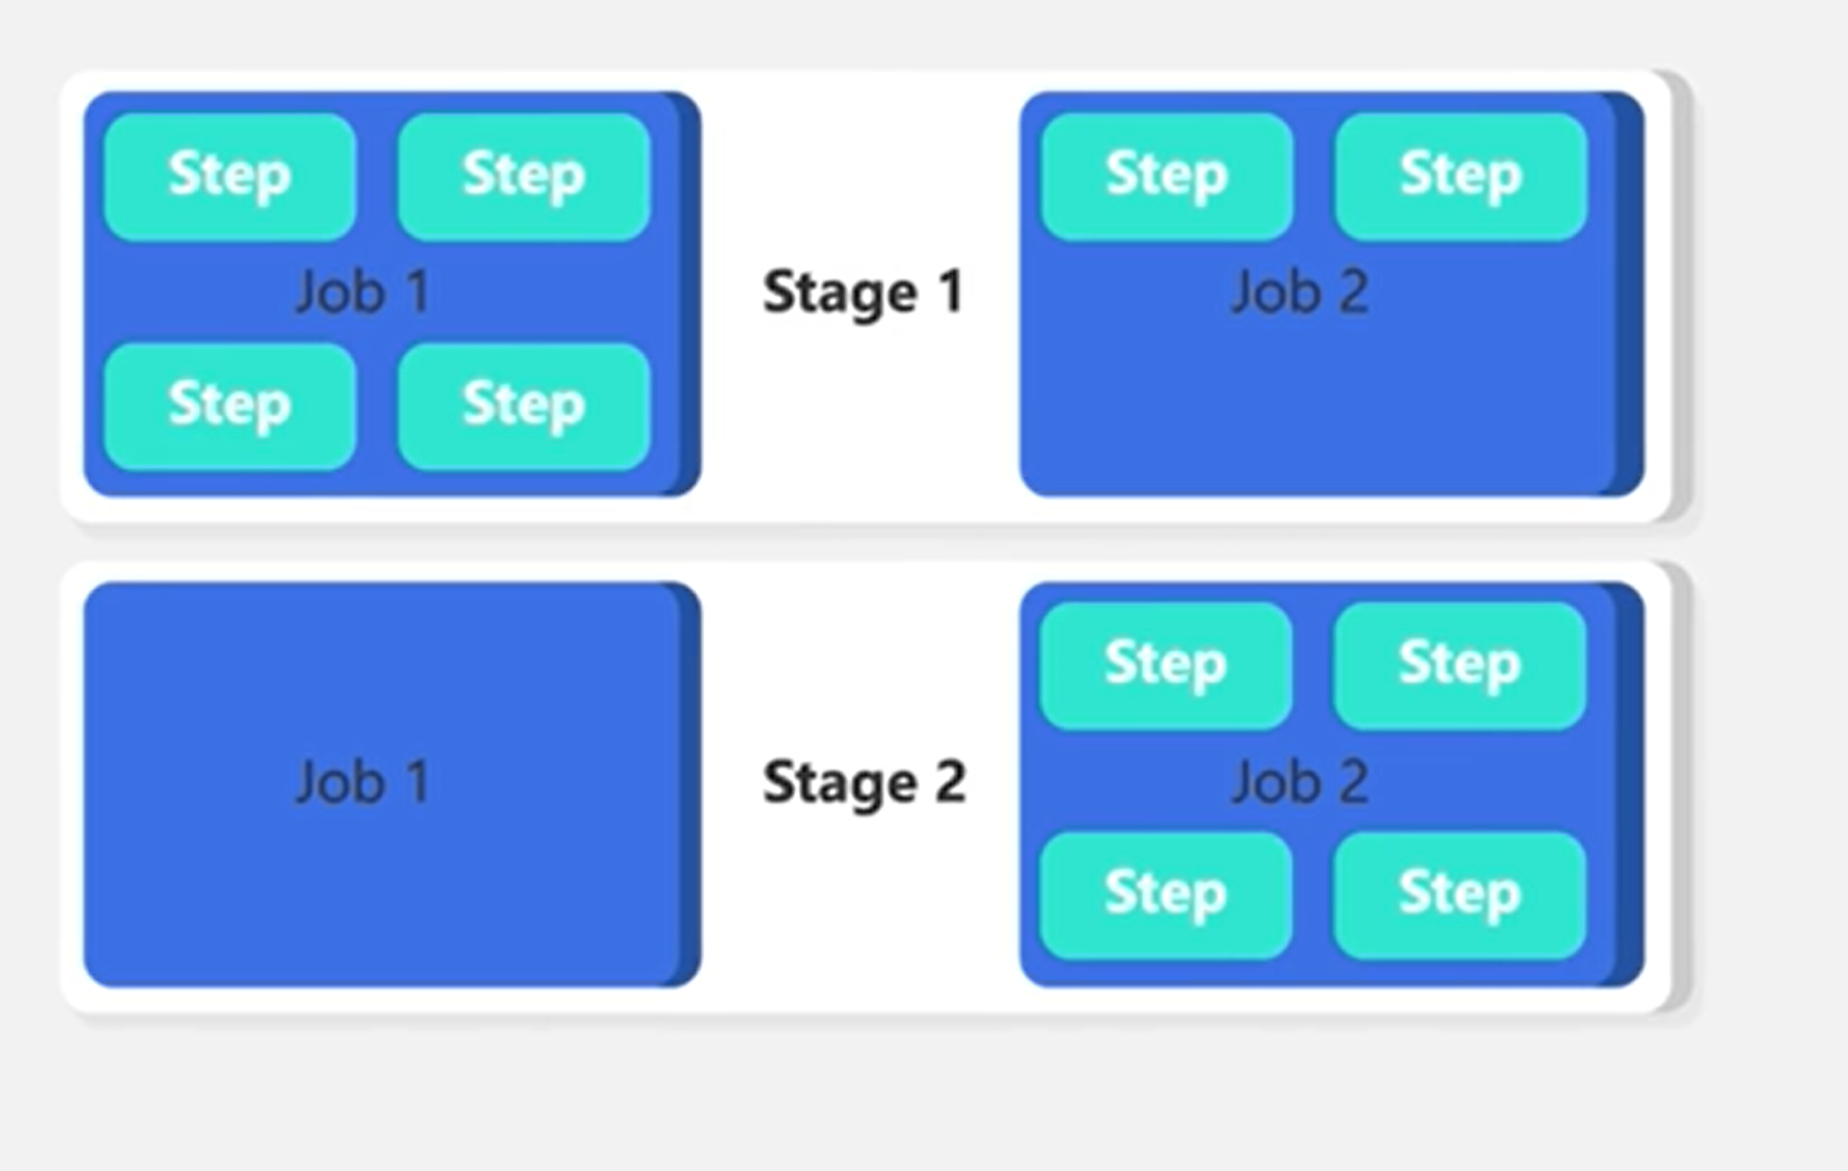
Azure Machine Learning pipelines
Optionally, you can create a pipeline with Azure Machine Learning components. When you create a component, the script will be stored with metadata like the necessary environment in the Azure Machine Learning workspace. Components can be shared and used by anyone within the same workspace, making it easier for others to quickly create new pipelines, building on your work.
To create a pipeline that can be used for automation, it’s recommended to define a pipeline job in YAML that can be triggered using a CLI (v2) command.
The YAML file that defines the pipeline needs to specify the following information:
- What to run: The steps defined as Python scripts or components.
- How to run it: Any inputs or outputs the steps may expect.
- Where to run it: The compute needed to execute the code (commonly an Azure Machine Learning compute cluster).
For example, a pipeline that takes raw data as input, transforms it, and trains a model may be defined in a pipeline-job.yml file:
$schema: https://azuremlschemas.azureedge.net/latest/pipelineJob.schema.json
type: pipeline
display_name: nyc-taxi-pipeline-example
experiment_name: nyc-taxi-pipeline-example
jobs:

  transform-job:
    type: command
      raw_data:
          type: uri_folder
          path: ./data
    outputs:
      transformed_data:
        mode: rw_mount
    code: src/transform
    environment: azureml:AzureML-sklearn-0.24-ubuntu18.04-py37-cpu@latest
    compute: azureml:cpu-cluster
    command: >-
      python transform.py
      --raw_data $
      --transformed_data $

  train-job:
    type: command
    inputs:
      training_data: $
    outputs:
      model_output:
        mode: rw_mount
      test_data:
        mode: rw_mount
    code: src/train
    environment: azureml:AzureML-sklearn-0.24-ubuntu18.04-py37-cpu@latest
    compute: azureml:cpu-cluster
    command: >-
      python train.py
      --training_data $
      --test_data $
      --model_output $
To run the pipeline within Azure Machine Learning, you’d use the following CLI command:
az ml job create --file pipeline-job.yml
Azure devops pipeline sidestep
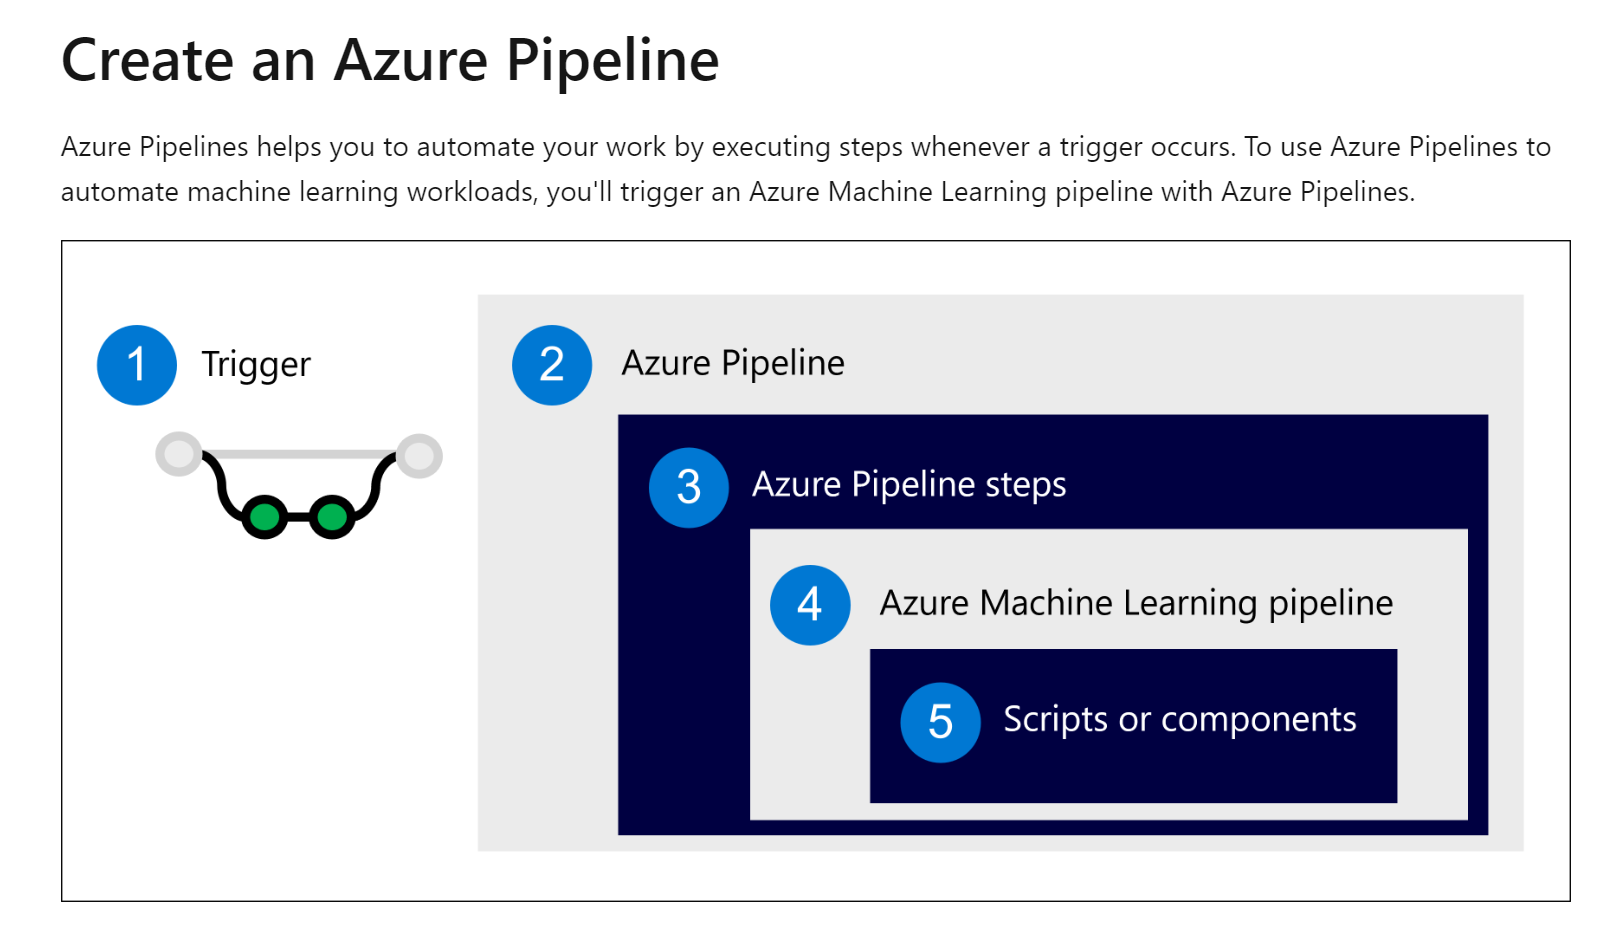
- Trigger an Azure Pipeline. Commonly with a change to the repo (commit or pull request).
- Run the Azure Pipeline, a group of jobs which consist of steps.
- A step initiates an Azure Machine Learning pipeline.
- An Azure Machine Learning pipeline runs scripts or Azure Machine Learning components.
- A script or component represents a machine learning task.
To create the Azure Pipeline, you define the steps you want to include in a YAML file. In the YAML file of the Azure Pipeline, you’ll include:
- Trigger: What event initiates the pipeline.
- Stage: A group of jobs commonly aligned with different development environments (dev/test/prod).
- Job: A set of steps, which run on an agent. For machine learning workloads, you’ll likely use a Microsoft-hosted Ubuntu agent.
- Step: A script or task you want to execute. For example, a CLI command, which initiates an Azure Machine Learning pipeline (az ml job create).
To run an Azure Machine Learning pipeline when any change to the Azure Repo is made, you may use a YAML file like this:
trigger:
- main

stages:
- stage: deployDev
  displayName: 'Deploy to development environment'
  jobs:
    - deployment: publishPipeline
      displayName: 'Model Training'
      pool:
        vmImage: 'Ubuntu-18.04'
      environment: dev
      strategy:
       runOnce:
         deploy:
          steps:
          - template: aml-steps.yml
            parameters:
              serviceconnectionname: 'spn-aml-workspace-dev'
The job in the pipeline uses the aml-steps.yml to list the steps that should be executed. To run an Azure Machine Learning pipeline that is defined in pipeline-job.yml you can use the CLI (v2). To run the Azure Machine Learning pipeline as a step in the Azure Pipeline, you’ll:
Install the Azure Machine Learning extension for the CLI. Use the az ml job create command to run the pipeline job in Azure Machine Learning. The aml-steps.yml file for the installation and Azure Machine Learning job initiation may look like this:
parameters:
- name: serviceconnectionname
  default: ''

steps:
- checkout: self

- script: az extension add -n ml -y
  displayName: 'Install Azure ML CLI v2'

- task: AzureCLI@2
  inputs:
    azureSubscription: $
    scriptType: bash
    scriptLocation: inlineScript
    workingDirectory: $(Build.SourcesDirectory)
    inlineScript: |
      cd src
      az ml job create --file aml_service/pipeline-job.yml --resource-group dev-ml-rg --workspace-name dev-ml-ws
  displayName: 'Run Azure Machine Learning Pipeline'
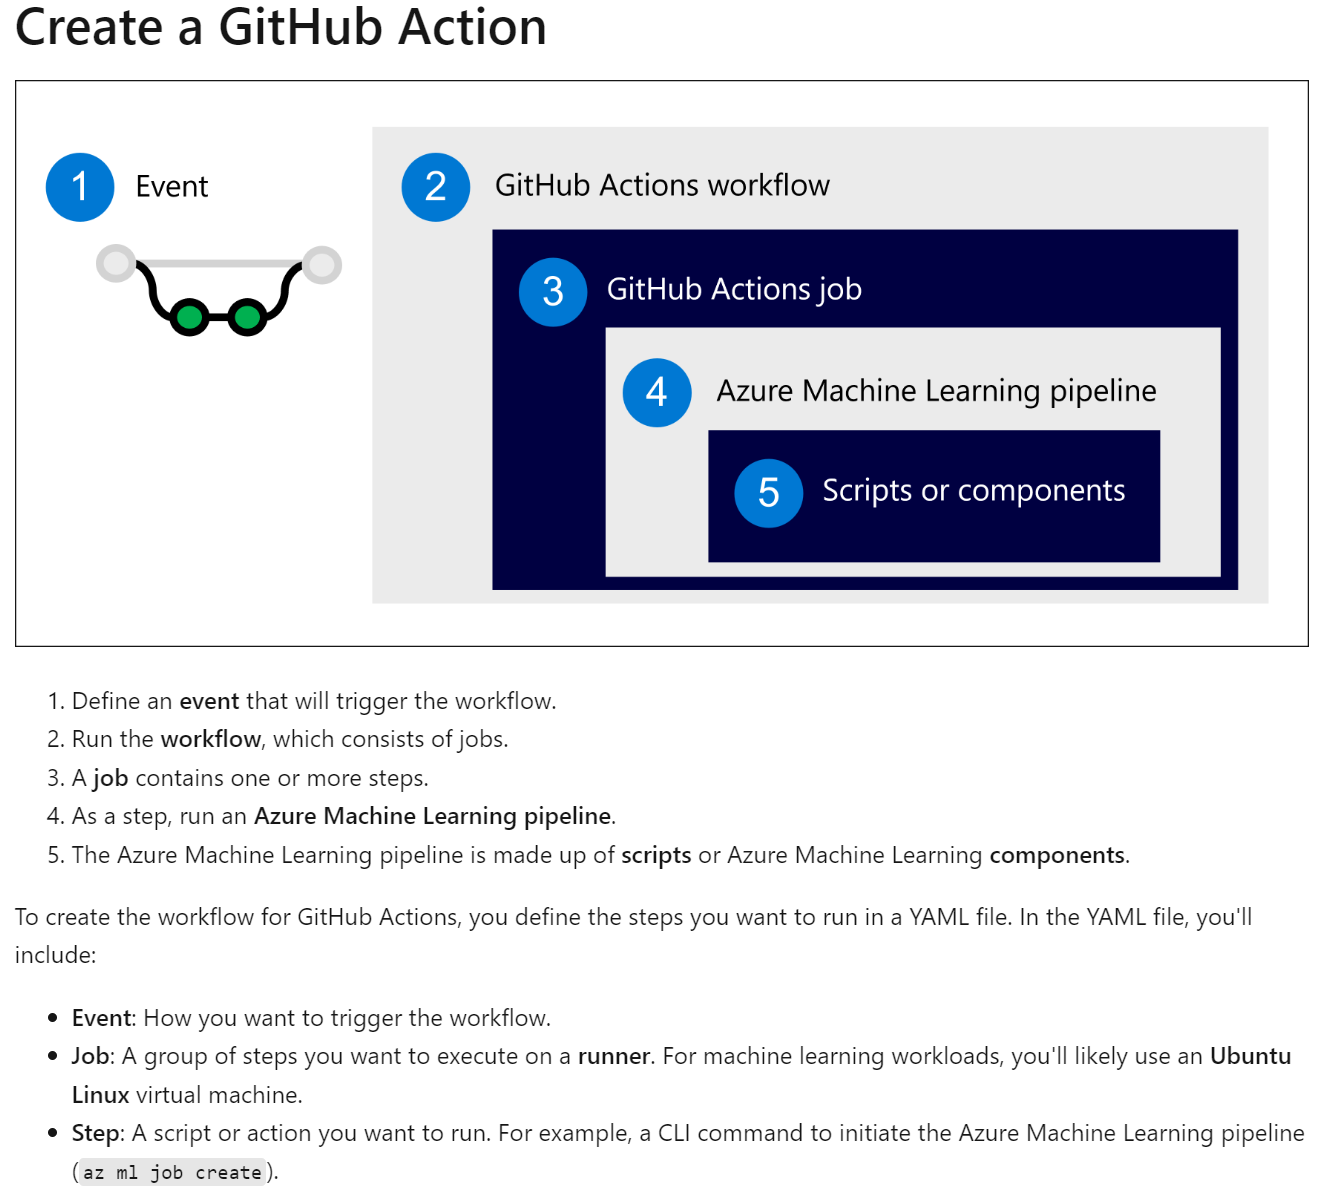
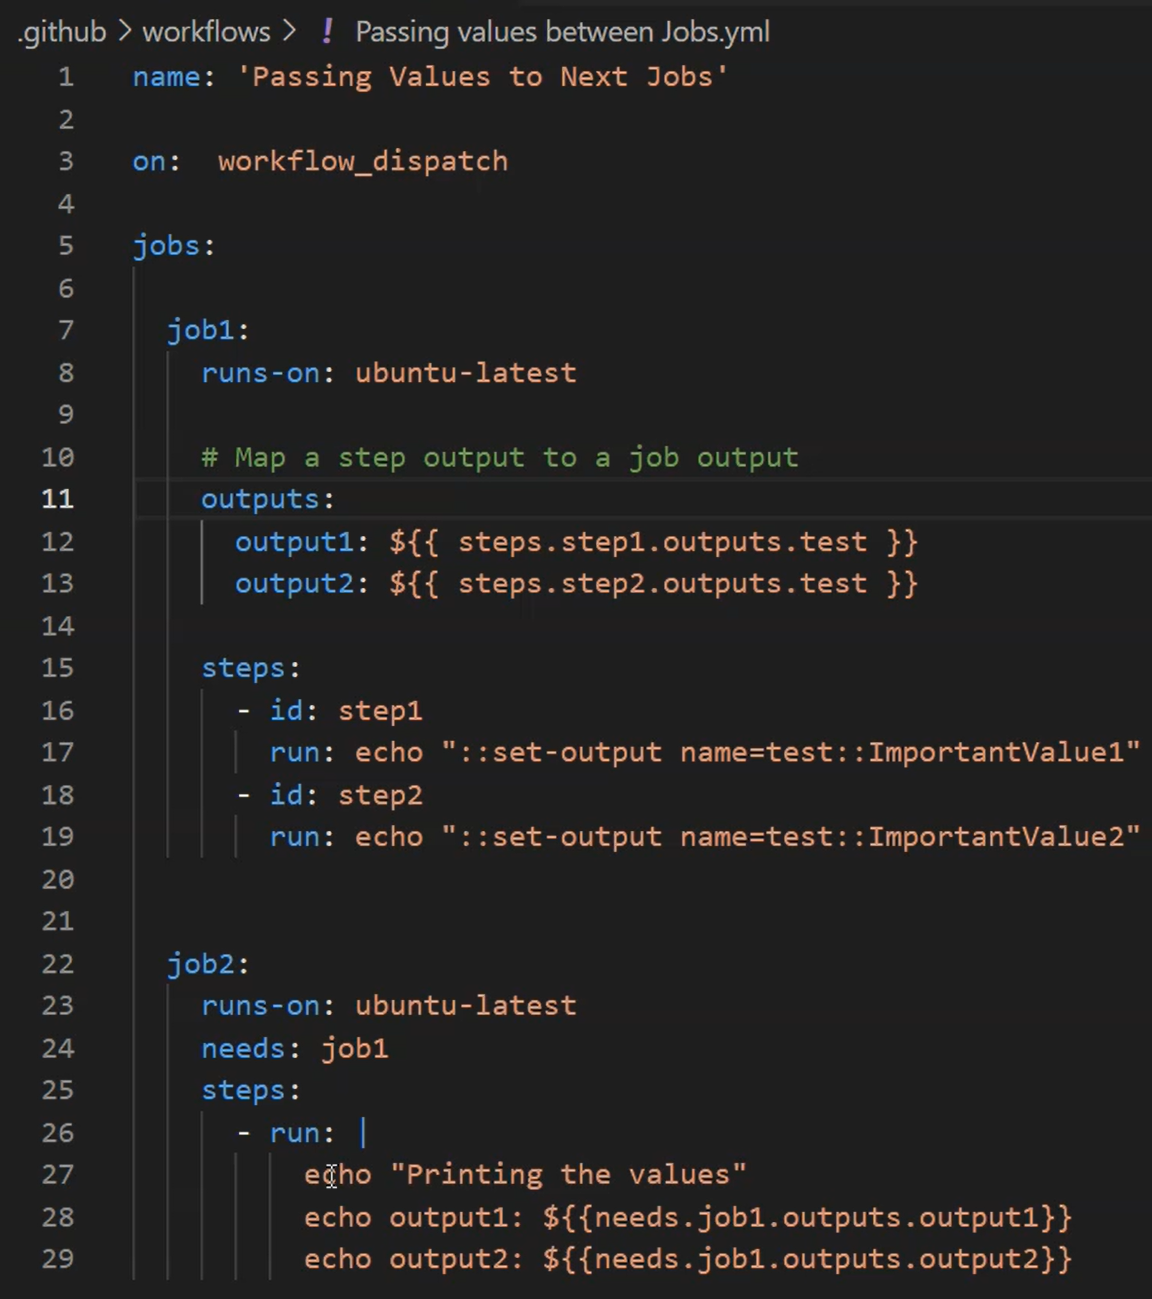
Github Actions
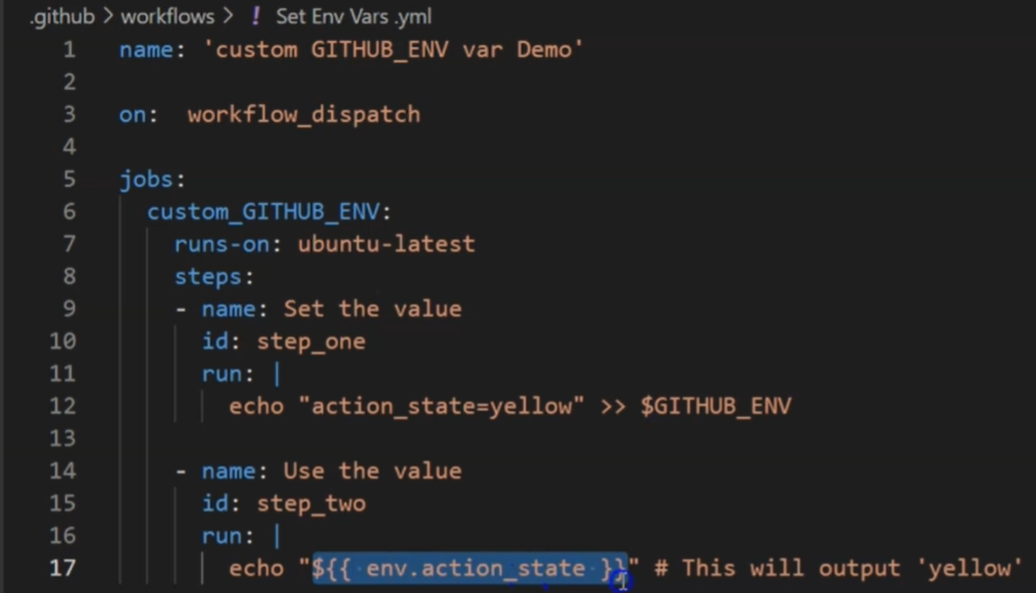
Way to dynamically create/access env variables in github workflows:
Back to mslearn
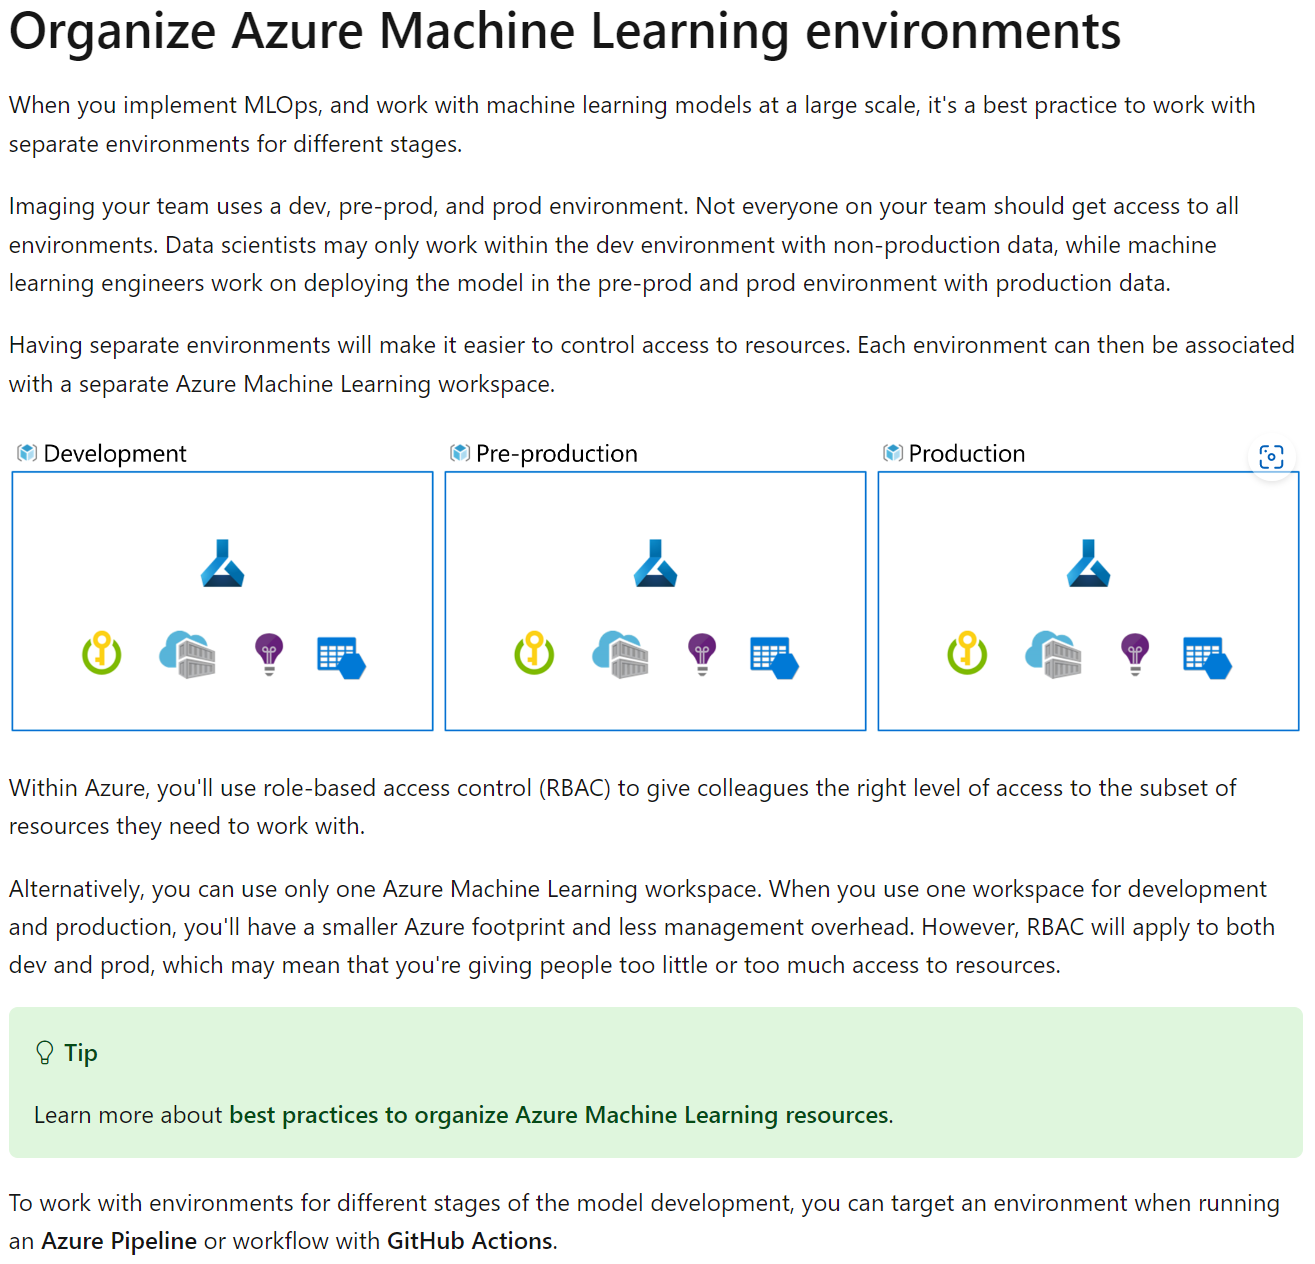
As machine learning often requires both an experimentation or development environment and a production environment, you’ll want to use continuous delivery to automate the process of moving a model from development to production.
End-To-End MLOPs
https://learn.microsoft.com/en-us/training/paths/build-first-machine-operations-workflow/
To operationalize the model, you’ll want to:
- Convert the model training to a robust and reproducible pipeline.
- Test the code and the model in a development environment.
- Deploy the model in a production environment.
- Automate the end-to-end process.

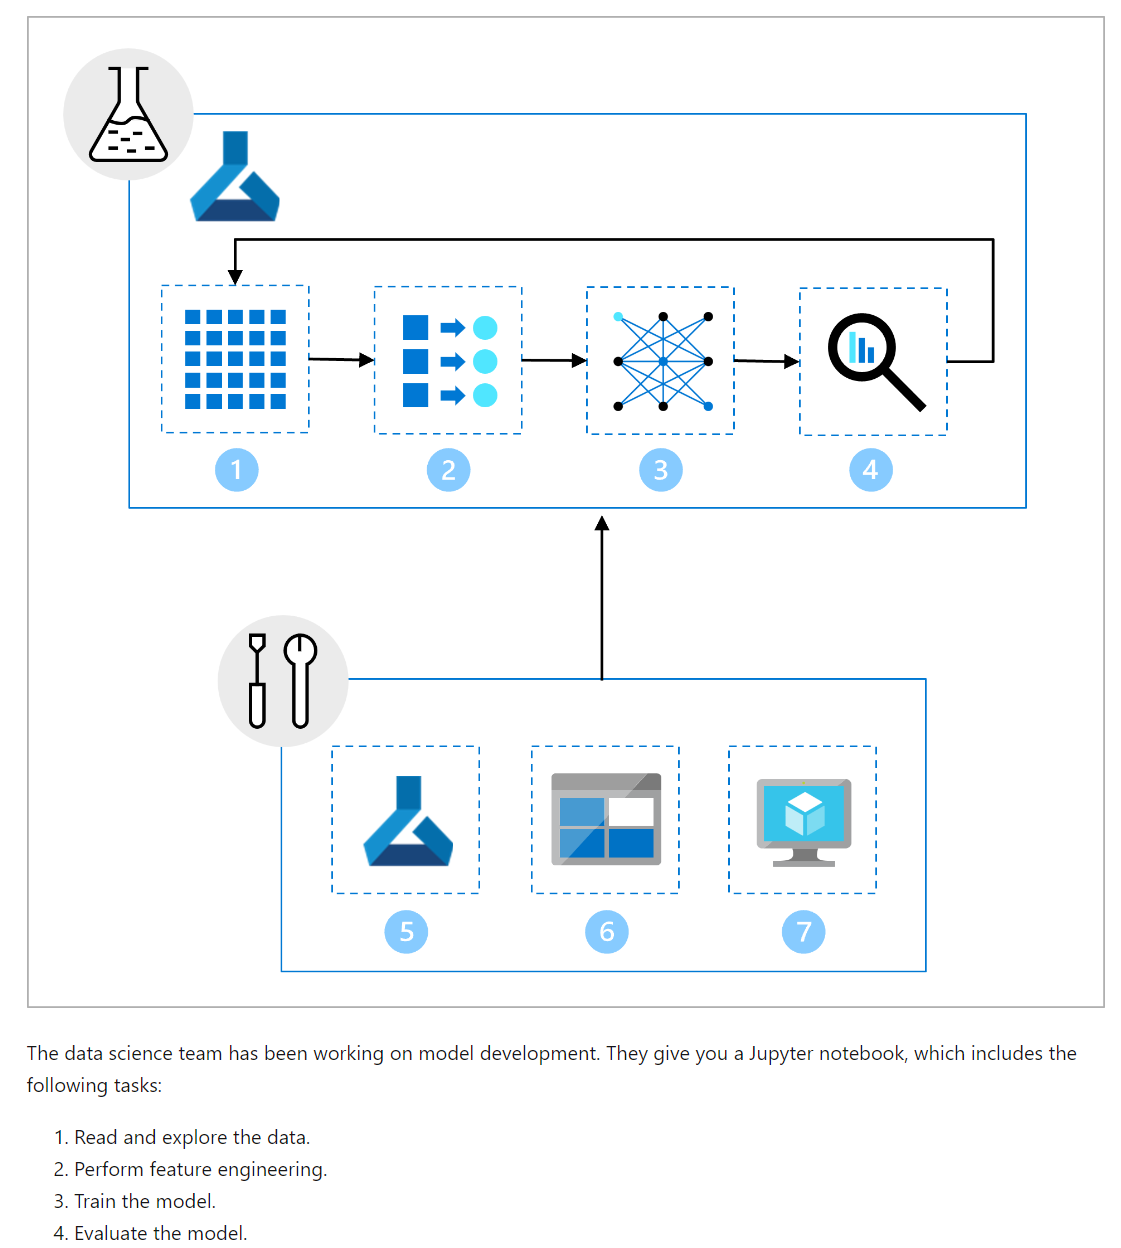
The main goal of the MLOps architecture is to create a robust and reproducible solution. To achieve that the architecture includes:
- Setup: Create all necessary Azure resources for the solution.
- Model development (inner loop): Explore and process the data to train and evaluate the model.
- Continuous integration: Package and register the model.
- Model deployment (outer loop): Deploy the model.
- Continuous deployment: Test the model and promote to production environment.
- Monitoring: Monitor model and endpoint performance.
Define Azure Machine Learning job To define a job in Azure Machine Learning, you can create a YAML file. Whether you want to run one script as a command job or multiple scripts sequentially as a pipeline. For both command and pipeline jobs, you’ll need to create a YAML file, which details:
Which scripts to run. What the inputs and outputs are for each script. The compute that will be used to run the scripts. The environment that needs to be installed on the compute to run the scripts. An example of a command job that uses a registered data asset as input when running the main.py script is shown in the following YAML:
$schema: https://azuremlschemas.azureedge.net/latest/commandJob.schema.json
code: src
command: >-
  python main.py
  --diabetes-csv $
inputs:
  diabetes:
    path: azureml:diabetes-data:1
    mode: ro_mount
environment: azureml:basic-env-scikit@latest
compute: azureml:aml-instance
experiment_name: diabetes-data-example
description: Train a classification model on diabetes data using a registered dataset as input.
In the YAML file, you’ll find the necessary details you need to include:
- The code refers to the local folder, which stores the scripts you want to run. The command key specifies that the main.py script in the src folder should be executed, using the value of inputs.diabetes for the diabetes-csv parameter.
- Version 1 of the registered data asset diabetes-data in the Azure Machine Learning workspace is mounted to the compute to be used as input for the script.
- The compute instance aml-instance will be used to run the scripts.
- The latest version of the registered custom basic-env-scikit environment will be installed on the compute instance before running the script.
4 data concepts:
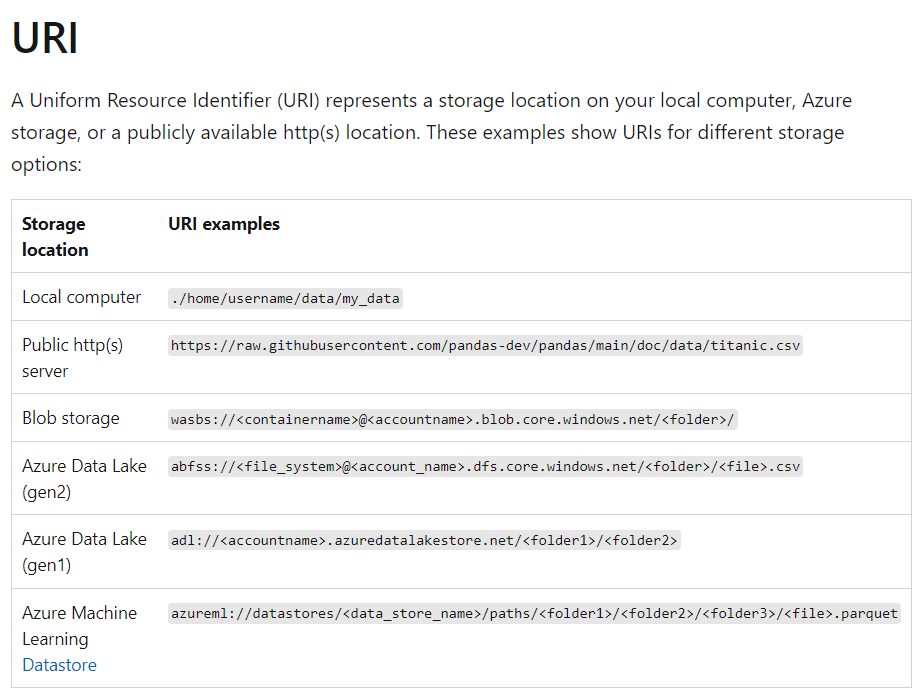
An Azure Machine Learning job maps URIs to the compute target filesystem. This mapping means that in a command that consumes or produces a URI, that URI works like a file or a folder. A URI uses identity-based authentication to connect to storage services, with either your Azure Active Directory ID (default), or Managed Identity. Azure Machine Learning Datastore URIs can apply either identity-based authentication, or credential-based (for example, Service Principal, SAS token, account key) without exposure of secrets.
Understand what happens when you submit a training job
The Azure training lifecycle consists of:
- Zipping the files in your project folder and upload to the cloud.
- except files definied in .gitignore/.amlignore
- Scaling up your compute cluster
- Building or downloading the dockerfile to the compute node
- it uses a hash of image/def etc to check whether it already exists..
- Downloading your zipped project to temporary storage on the compute node
- Unzipping the project file
- The compute node executing python
- Saving logs, model files and other files written to ./outputs to the storage account associated wit the workspace
- Scaling down compute, including removing temp storage
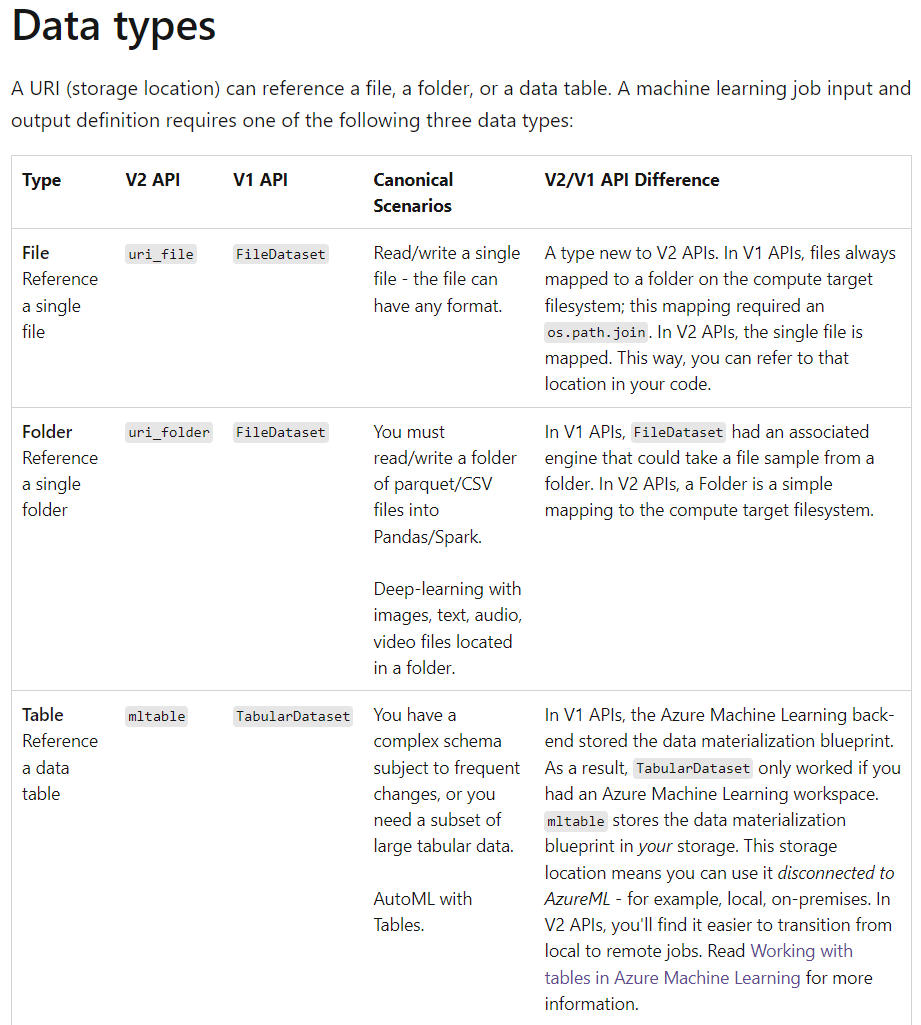
Data Assets
In this article, you’ll learn how to create a data asset in Azure Machine Learning. An Azure Machine Learning data asset is similar to web browser bookmarks (favorites). Instead of remembering long storage paths (URIs) that point to your most frequently used data, you can create a data asset, and then access that asset with a friendly name.
Data asset creation also creates a reference to the data source location, along with a copy of its metadata. Because the data remains in its existing location, you incur no extra storage cost, and don’t risk data source integrity. You can create Data assets from Azure Machine Learning datastores, Azure Storage, public URLs, and local files.
from azure.ai.ml.entities import Data
from azure.ai.ml.constants import AssetTypes

# Supported paths include:
# local: './<path>'
# blob:  'https://<account_name>.blob.core.windows.net/<container_name>/<path>'
# ADLS gen2: 'abfss://<file_system>@<account_name>.dfs.core.windows.net/<path>/'
# Datastore: 'azureml://datastores/<data_store_name>/paths/<path>'

my_path = '<path>'

my_data = Data(
    path=my_path,
    type=AssetTypes.URI_FOLDER,
    description="<description>",
    name="<name>",
    version='<version>'
)

ml_client.data.create_or_update(my_data)
MLflow: What’s the difference between an artifact and a model?
Artifact
Any file generated (and captured) from an experiment’s run or job is an artifact.
filename = 'model.pkl'
with open(filename, 'wb') as f:
  pickle.dump(model, f)

mlflow.log_artifact(filename)
###Models
A model in MLflow is also an artifact. However, we make stronger assumptions about this type of artifacts. Such assumptions provide a clear contract between the saved files and what they mean. When you log your models as artifacts (simple files), you need to know what the model builder meant for each of them in order to know how to load the model for inference. On the contrary, MLflow models can be loaded using the contract specified in the The MLModel format.
In Azure Machine Learning, logging models has the following advantages:
You can deploy them on real-time or batch endpoints without providing an scoring script nor an environment. When deployed, Model’s deployments have a Swagger generated automatically and the Test feature can be used in Azure Machine Learning studio. Models can be used as pipelines inputs directly. You can use the Responsible AI dashbord (preview).
import mlflow
mlflow.sklearn.log_model(sklearn_estimator, "classifier")
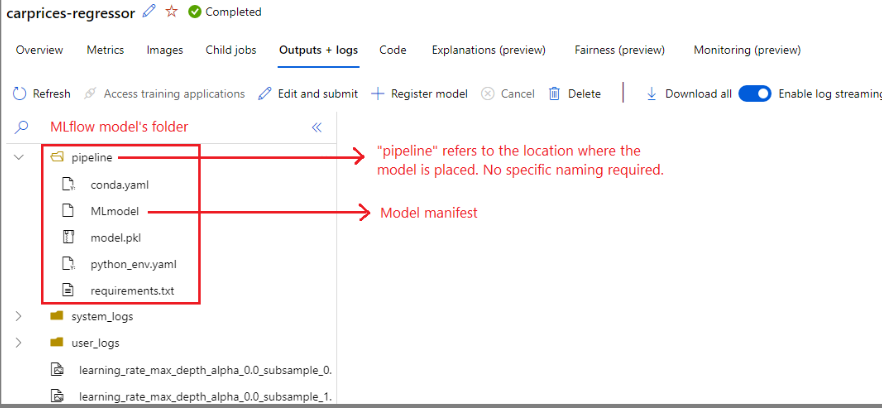
MLflow adopts the MLmodel format as a way to create a contract between the artifacts and what they represent. The MLmodel format stores assets in a folder. Among them, there is a particular file named MLmodel. This file is the single source of truth about how a model can be loaded and used.
artifact_path: classifier
flavors:
  fastai:
    data: model.fastai
    fastai_version: 2.4.1
  python_function:
    data: model.fastai
    env: conda.yaml
    loader_module: mlflow.fastai
    python_version: 3.8.12
model_uuid: e694c68eba484299976b06ab9058f636
run_id: e13da8ac-b1e6-45d4-a9b2-6a0a5cfac537
signature:
  inputs: '[{"type": "tensor",
             "tensor-spec":
                 {"dtype": "uint8", "shape": [-1, 300, 300, 3]}
           }]'
  outputs: '[{"type": "tensor",
              "tensor-spec":
                 {"dtype": "float32", "shape": [-1,2]}
            }]'
The model’s flavors
Considering the variety of machine learning frameworks available to use, MLflow introduced the concept of flavor as a way to provide a unique contract to work across all of them. A flavor indicates what to expect for a given model created with a specific framework. For instance, TensorFlow has its own flavor, which specifies how a TensorFlow model should be persisted and loaded. Because each model flavor indicates how they want to persist and load models, the MLModel format doesn’t enforce a single serialization mechanism that all the models need to support. Such decision allows each flavor to use the methods that provide the best performance or best support according to their best practices - without compromising compatibility with the MLModel standard.
Signatures
Model signatures in MLflow are an important part of the model specification, as they serve as a data contract between the model and the server running our models. They are also important for parsing and enforcing model’s input’s types at deployment time. MLflow enforces types when data is submitted to your model if a signature is available.
Signatures are indicated when the model gets logged and persisted in the MLmodel file, in the signature section. Autolog’s feature in MLflow automatically infers signatures in a best effort way. However, it may be required to log the models manually if the signatures inferred are not the ones you need.
There are two types of signatures:
Column-based signature corresponding to signatures that operate to tabular data. For models with this signature, MLflow supplies pandas.DataFrame objects as inputs. Tensor-based signature: corresponding to signatures that operate with n-dimensional arrays or tensors. For models with this signature, MLflow supplies numpy.ndarray as inputs (or a dictionary of numpy.ndarray in the case of named-tensors).
Azure ML Registries
Create a client connection to both the Azure Machine Learning workspace and registry:
ml_client_workspace = MLClient( credential=credential,
    subscription_id = "<workspace-subscription>",
    resource_group_name = "<workspace-resource-group",
    workspace_name = "<workspace-name>")
print(ml_client_workspace)

ml_client_registry = MLClient(credential=credential,
                        registry_name="<REGISTRY_NAME>",
                        registry_location="<REGISTRY_REGION>")
print(ml_client_registry)
We’ll create an environment that uses the python:3.8 docker image and installs Python packages required to run a training job using the SciKit Learn framework. The Dockerfile with base image and list of Python packages to install is available in cli/jobs/pipelines-with-components/nyc_taxi_data_regression/env_train. Initialize the environment object and create the environment.
env_docker_context = Environment(
    build=BuildContext(path="../../../../cli/jobs/pipelines-with-components/nyc_taxi_data_regression/env_train/"),
    name="SKLearnEnv",
    version=str(1),
    description="Scikit Learn environment",
)
ml_client_registry.environments.create_or_update(env_docker_context)
good resource: https://learn.microsoft.com/en-us/azure/machine-learning/how-to-share-models-pipelines-across-workspaces-with-registries?tabs=python
https://learn.microsoft.com/en-us/azure/machine-learning/concept-train-model-git-integration?tabs=python